Ready to take your Instagram Stories to the next level?
From little-known design tricks to engagement-boosting tips, we’re sharing all the Instagram Stories hacks you need to know in 2024.
FYI: Later's Instagram Stories tools are trusted by 7M+ brands, creators, and marketers to boost engagement and reach. Create an account today.
Table of Contents
Instagram Stories Design Hacks
Trick your followers into thinking you’re a natural born designer with these Instagram Stories design hacks:
Hack #1: Later’s Canva Templates
If you need to create something quickly, using pre-made templates can be your go-to.
And lucky for you, we have 30+ customizable Instagram Story templates — whether you’re highlighting your latest launch or hosting a Q&A.
The best part? With Later's Canva integration, you can easily import your customized templates to our media library and schedule them in advance.
Hack #2: Uncover Hidden Colors
ICYMI: You can access every color of the rainbow with this easy trick.
Simply select the brush tool in Instagram Stories, then tap and hold any color to reveal a color slider.
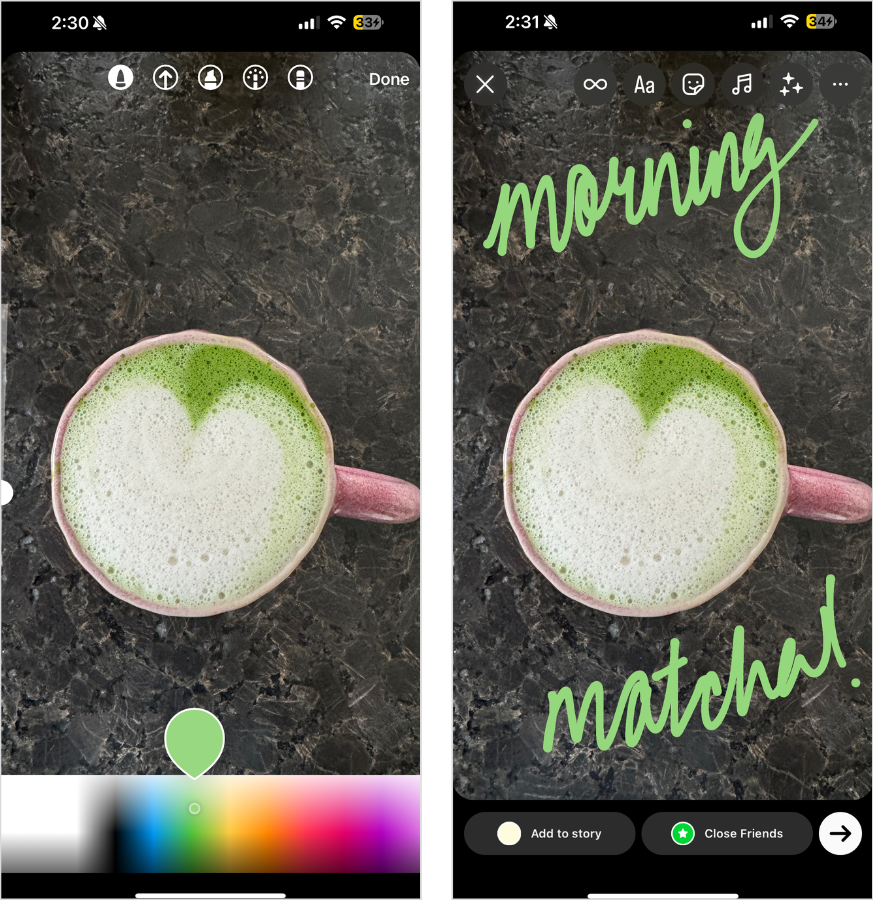
And voila — an unlimited number of shades to spruce up your 24-hour content.
Hack #3: Add a Custom Backdrop
From product highlights to weekly roundups, a custom backdrop is a perfect (and simple) way to add life to your Instagram Stories.
And there are two ways to do it: by filling your background with a solid color or selecting a background image from your camera roll.
To set a solid color as your background, follow the steps in Hack #1 to select a color.
Then, tap and hold on the screen for 1-3 seconds to set your background. If you’ve shared a feed post to stories, the background will fill with your chosen color behind the post.
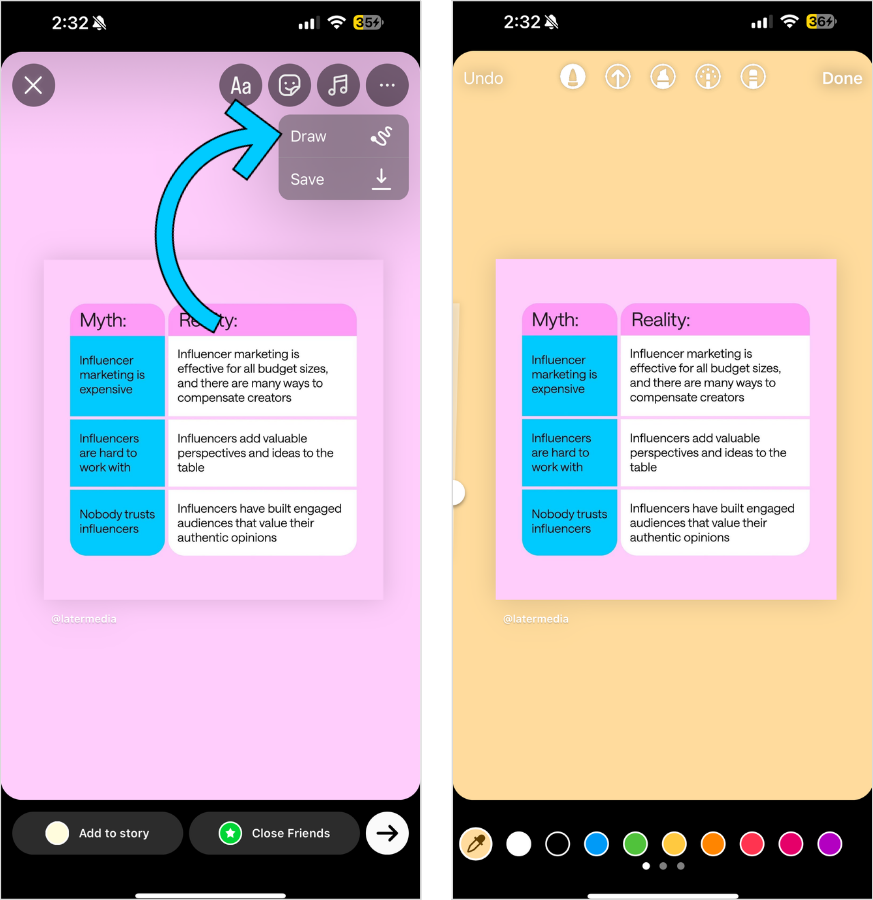
To set an image as your background, share a post to your story as normal.
Then, select the photo sticker from the sticker tray to import the image you want to use as your backdrop.
Move the feed post to one side of your screen and expand the added photo using two fingers (in a pinch motion).
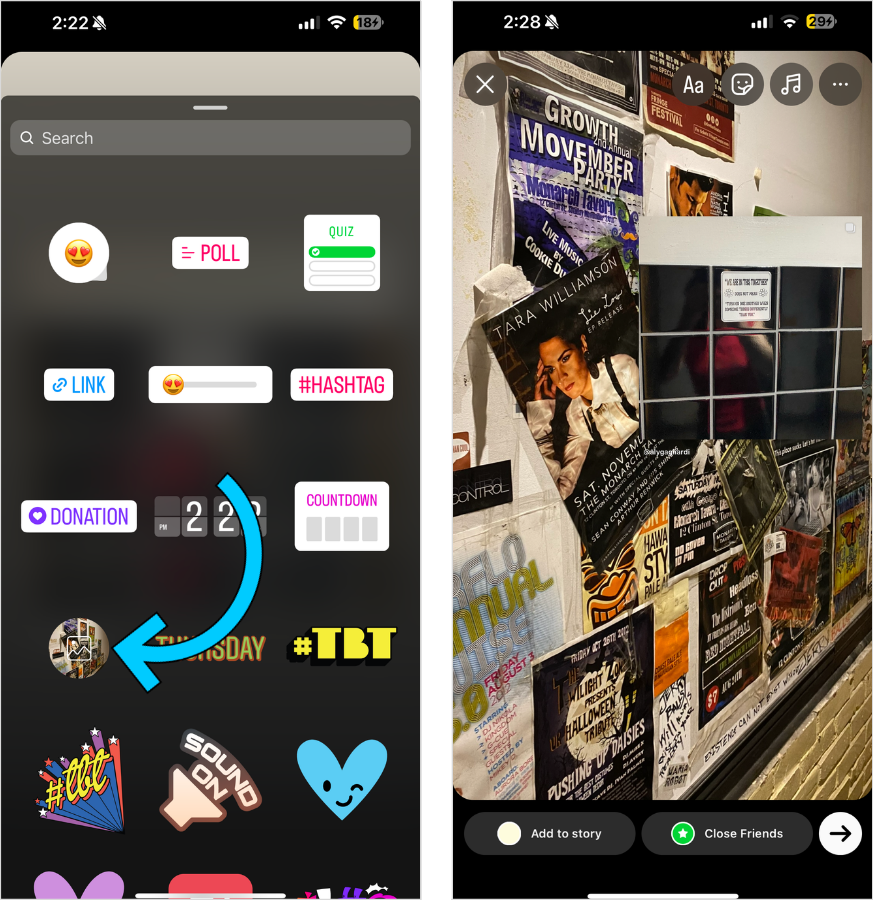
At the same time, tap and hold the original feed post using your thumb to keep it as the top layer — and you’ve got your masterpiece!
Hack #4: Import Custom Fonts
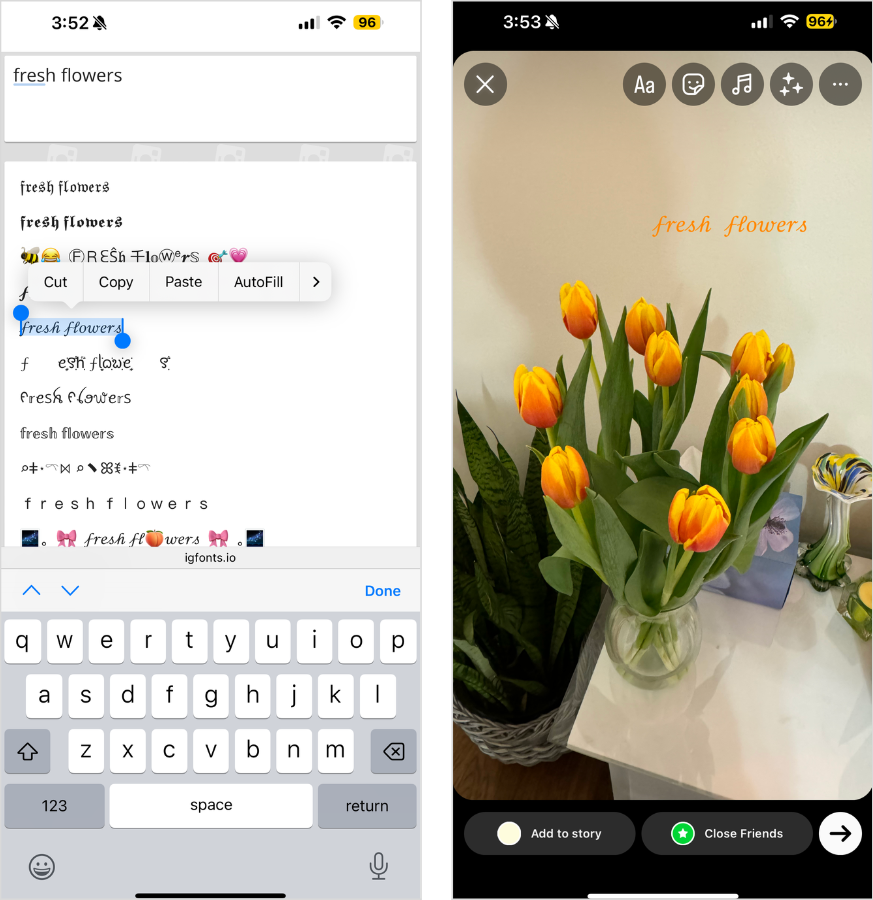
If you’re looking to make your Instagram Stories feel a little more “on-brand,” adding a custom font is a great option.
It’s easy: Visit Instagram Fonts Generator on web or mobile, type in your text, and copy/paste your favorite rendition into your story.
Hack #5: Create Effects with the Eraser Tool
Did you know you can use the eraser tool to create cool effects on Instagram Stories?
First, upload the photo of your choice and use the draw tool to draw an effect over the image.

Then, use the eraser to create a 3D effect. The possibilities are endless!
Hack #6: Add Music to Your Instagram Stories
Another top hack? Adding a theme song to your Instagram Stories using the music sticker.
You can scroll through a “For You” tab of suggested songs, browse by categories, or search for the perfect tune.
Once you’ve made your pick, you can choose the exact part that fits your story, how long you want it to be (the maximum is 15 seconds), and customize the sticker’s look by tapping.
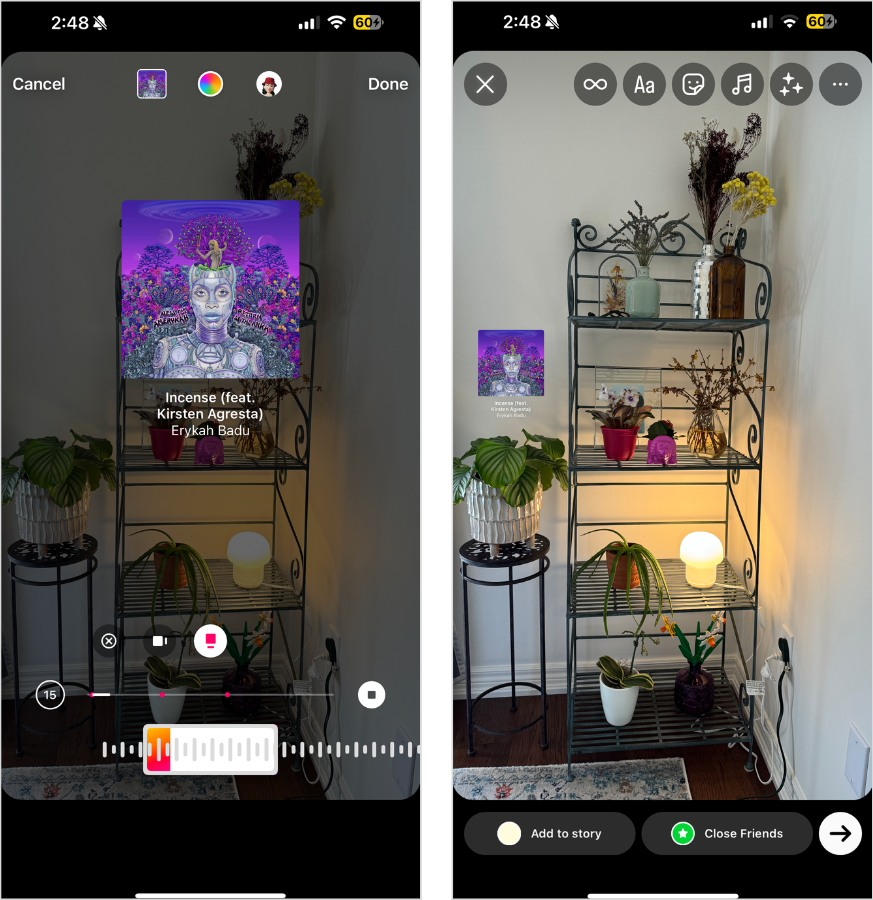
NOTE: Instagram Business accounts only have a limited selection of music due to Instagram’s licensing agreements.
Hack #7: Add Brand Colors
While Instagram’s full color palette is extensive, it can be tough to pinpoint a specific color.
Thankfully, there’s an Instagram Stories hack to add your exact brand colors.
Tap the photos sticker to add an image with your chosen colors and use the color picker tool to sample a hue.
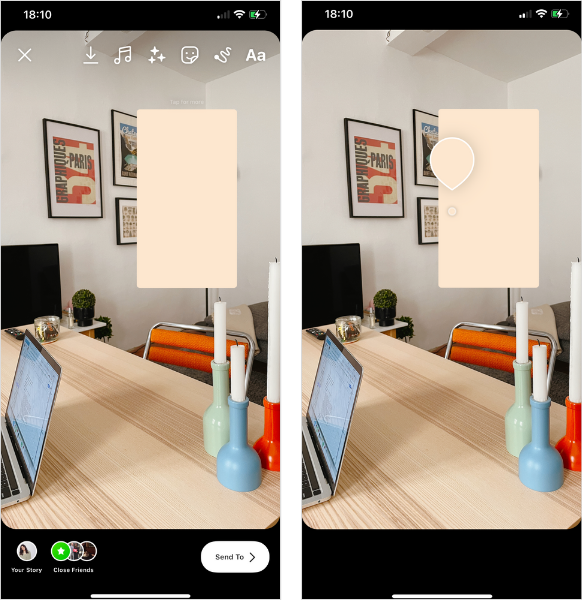
You can then use this color for your stories background, the draw tool, or your text.
Then, slide and trash your reference image to debut your branded Instagram story.
P.S. You can schedule your Instagram Stories in advance with Later's scheduling tools. Sign up today.
Instagram Stories Photo Hacks
A photo is worth a thousand words (and three Instagram Stories hacks):
Hack #8: Add Multiple Photos to Your Instagram Stories
FYI: Layering isn’t exclusive to fall fashion — it’s an all-star Instagram Stories hack.
Either copy and paste photos from your camera roll or use the photos sticker multiple times to create your masterpiece.
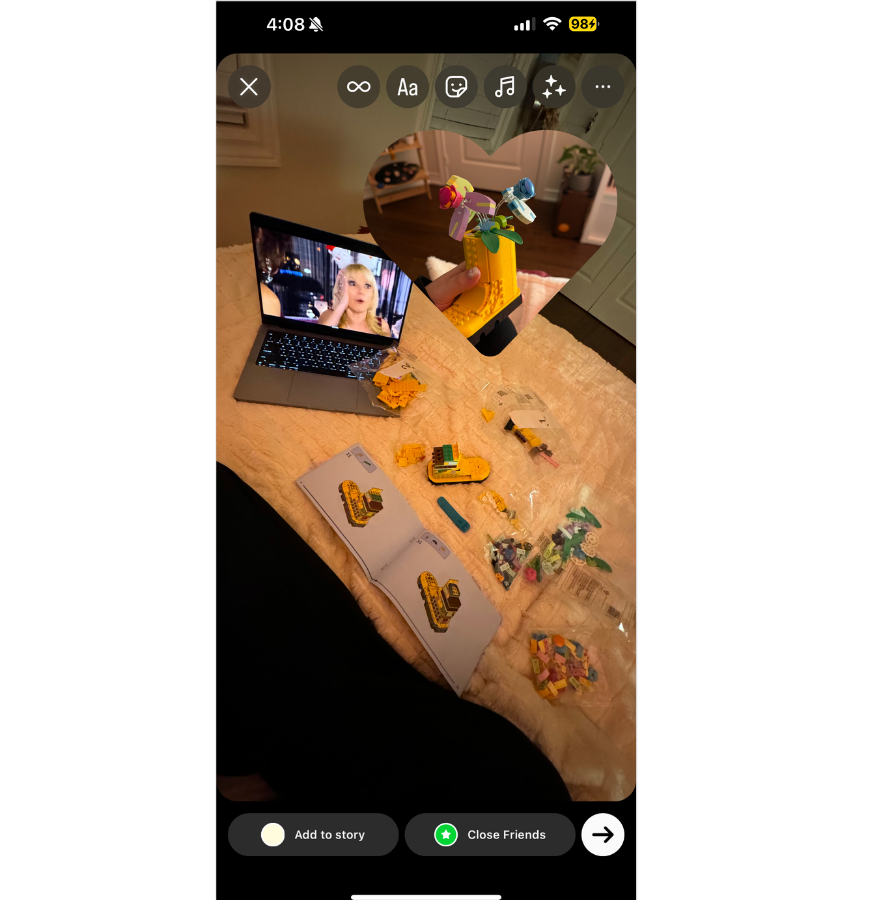
TIP: Tap your photos sticker images multiple times to change the shape of your image.
Hack #9: Turn Live Photos Into Boomerangs
PSA: You can turn live photos into fun Boomerangs.
Open Instagram Stories, swipe up, and pick a live photo from your camera roll (you’ll see the Boomerang icon on eligible photos).
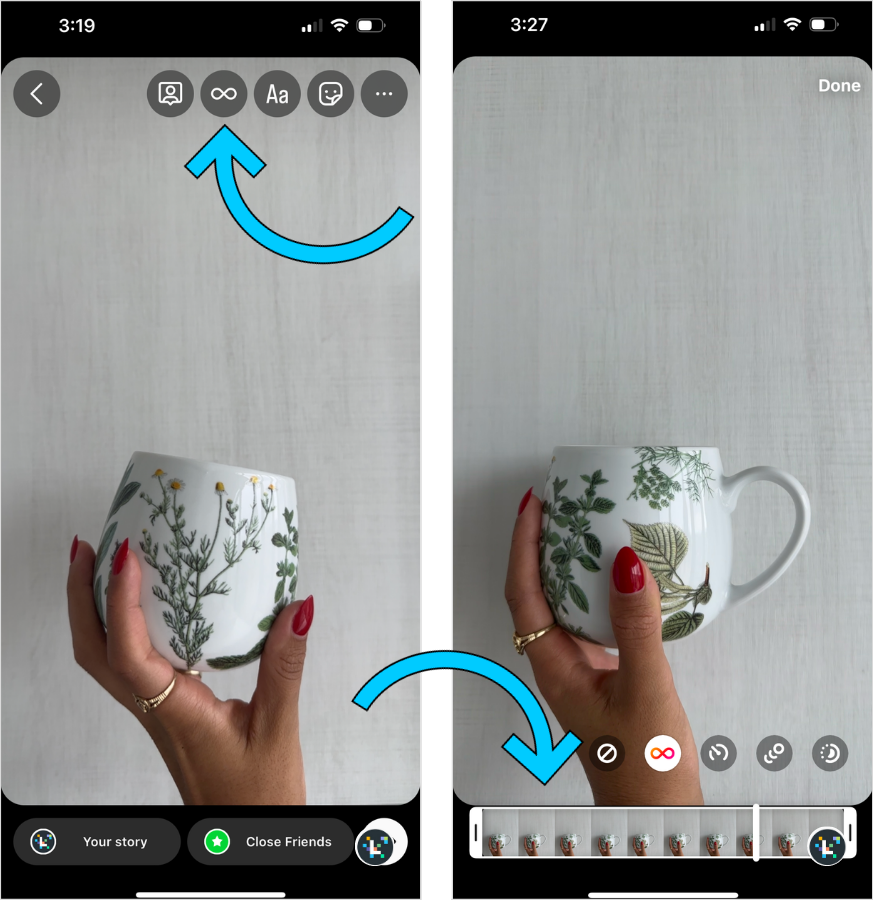
Once selected, tap the Boomerang symbol at the top of your screen — and that’s it!
Hack #10: Create “Progression” Posts
Hot tip: Build suspense over a series of posts by adding new elements to the same base image.
All you have to do is create a story as usual and press save before uploading.
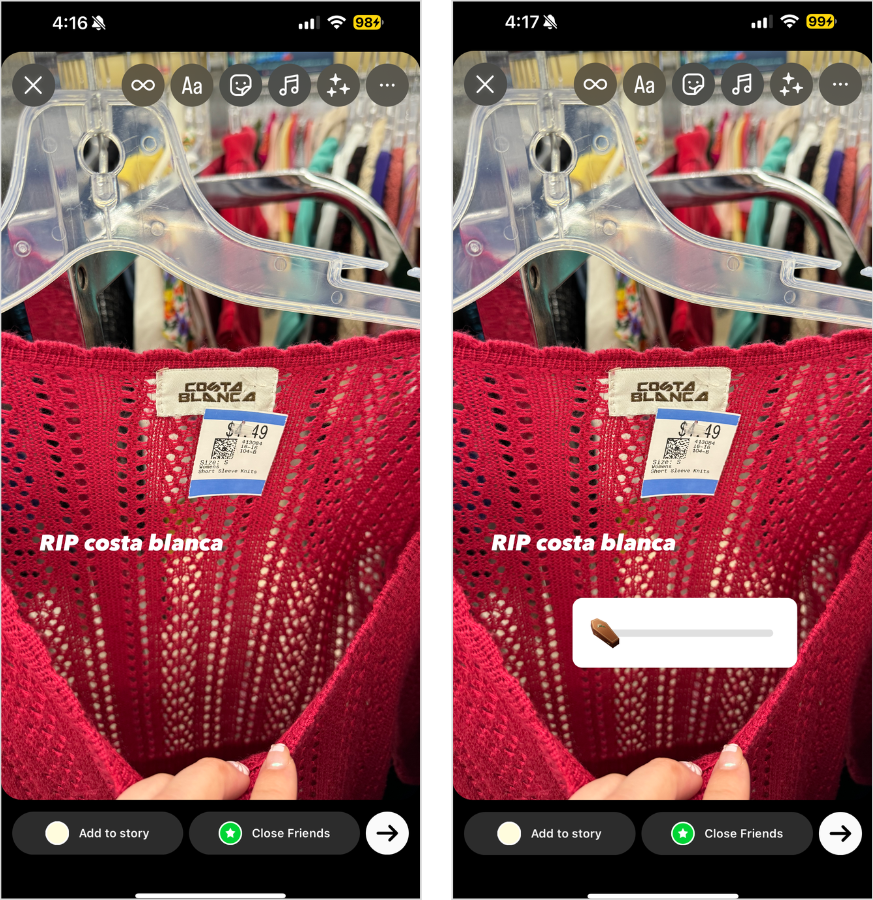
Then, create a new story, building upon the previous one, and repeat the process until you’re complete.
With Later’s Instagram Stories scheduler, you can storyboard your stories in advance — create an account today.
Instagram Stories Video Hacks
Step into the role of video editor with these Instagram Stories video hacks:
Hack #11: Use “Hidden” Instagram Stories Filters
Did you know you can access a bunch of hidden Instagram Stories photo and video effects?
Open up your camera, swipe all the way to the end, and select “Browse Effects” to discover an endless scroll of filters.
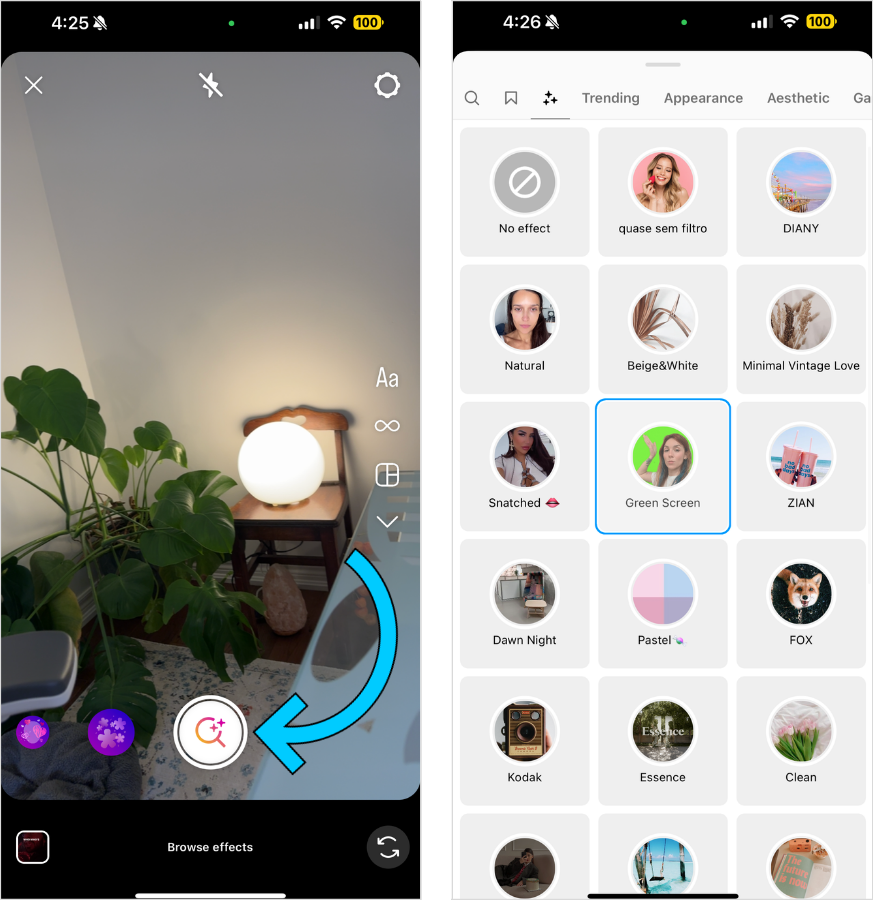
Our favorite? Green Screen by Instagram to walk through your latest product or recap the week’s celebrity gossip.
Hack #12: Use Automatic Closed Captions
Instagram’s closed captions sticker makes it easier than ever to add closed captions to your stories.
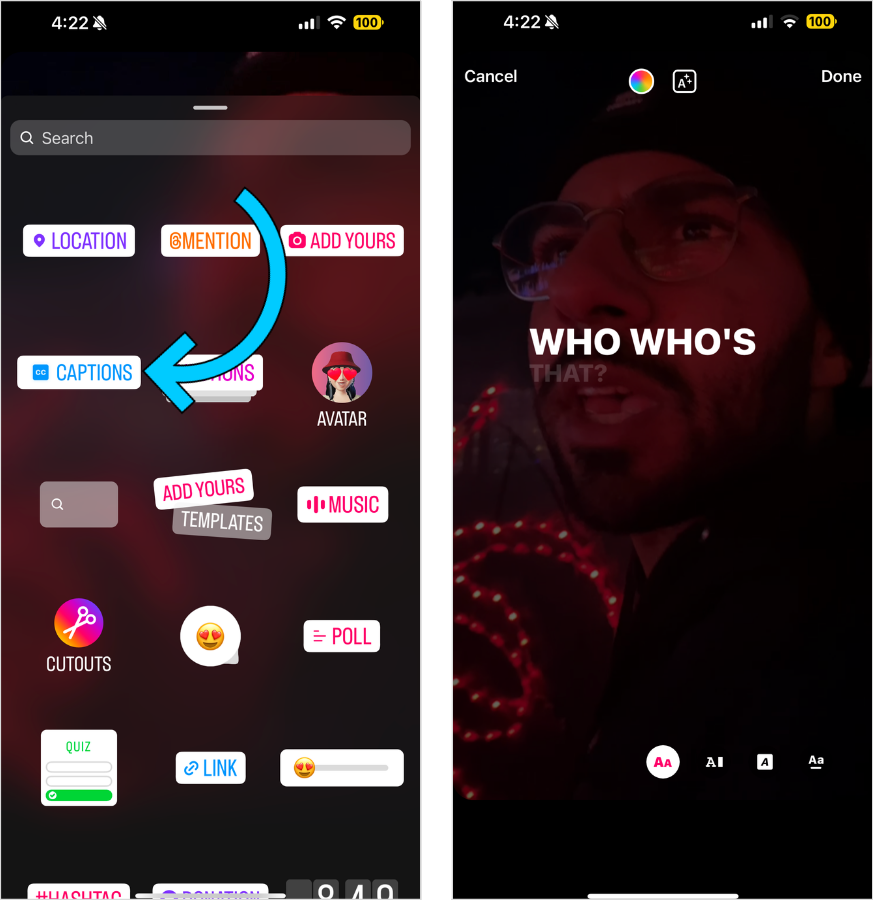
Record or upload your video to stories and select the sticker to make your content more accessible and visually exciting — win-win.
Hack #13: Use a Third-party Editing App
Using a third-party editing app is a foolproof way to capture attention on stories (with little effort).
Bonus points if you cross-post on Reels.
Instagram Stories Sticker Hacks
Instagram Stories sticker hacks that’ll make your engagement stick:
Hack #14: Hide Hashtags & Mentions
Hashtags and mentions don’t have to sacrifice your Instagram Stories aesthetic.
Simply layer a photo on top or slide them all the way to the side to preserve a clean design.
Hack #15: Share Multiple Answers on a Single Story
The Instagram Stories question sticker is loved by brands and creators alike.
The drawback? You can only share one question sticker answer per story.
But with this hack, you can share multiple.
First, create a story with a response to your question sticker. Then, take a screenshot or save the image and exit out of the story.
Open that screenshot, create a second story using a different question sticker response, and repeat until you have multiple question stickers on a single story.
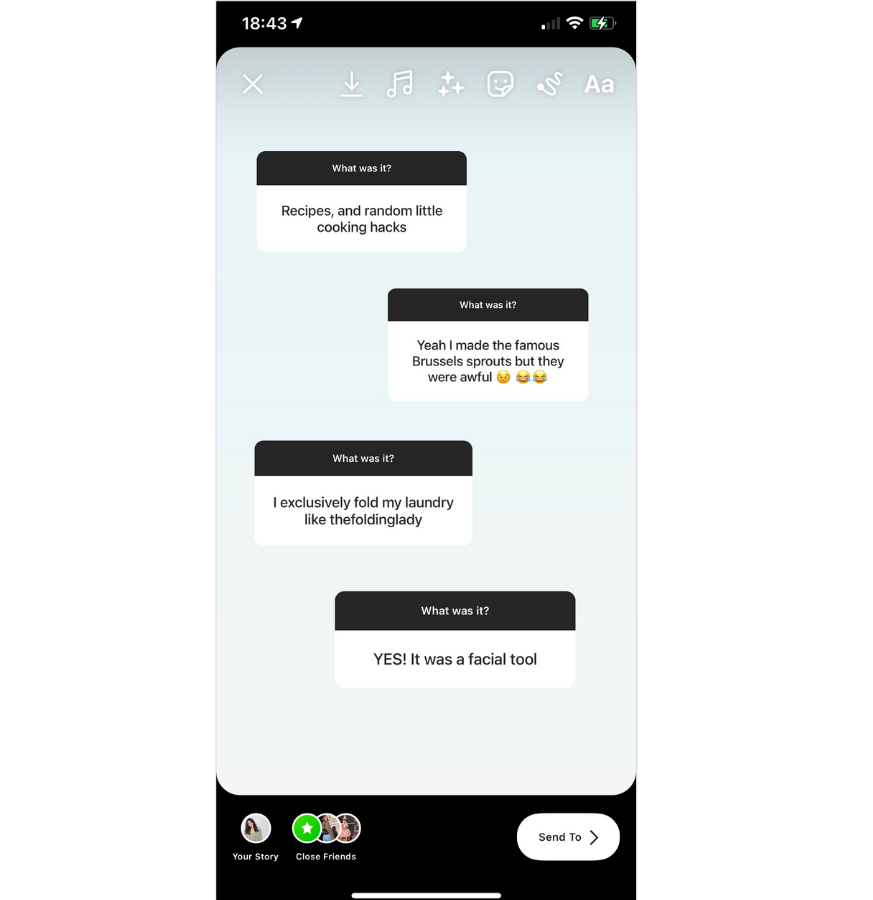
Your followers (and their thumbs) will thank you!
Hack #16: Add Custom Stickers
Whether you want to remove the background from a product photo or highlight a trending meme, the custom stickers option is an Instagram Stories hack like no other.

Select it from the sticker tray and choose a photo from your camera roll to automatically sticker-ize it. Easy-peasy.
Hack #17: Add AI Stickers to Your Instagram Stories
No luck finding the perfect sticker to tie your story together? Instagram’s new AI sticker feature is your answer.
Select the feature from the sticker tray, type in whatever your heart desires, and see what it spits out.
Hack #18: Use Instagram's Notify Sticker
Pro tip: You can now add a ‘Notify’ sticker to your stories, so your most dedicated community members won’t miss your content!
Pop it in a story from the sticker tray to have users easily turn on notifications.
Other Instagram Stories Tips & Tricks
Last but not least, here are our favorite uncategorizable Instagram Stories hacks:
Hack #19: Use Instagram’s Dual Feature
This BeReal-esque feature is perfect for sharing your reaction to anything under the sun.
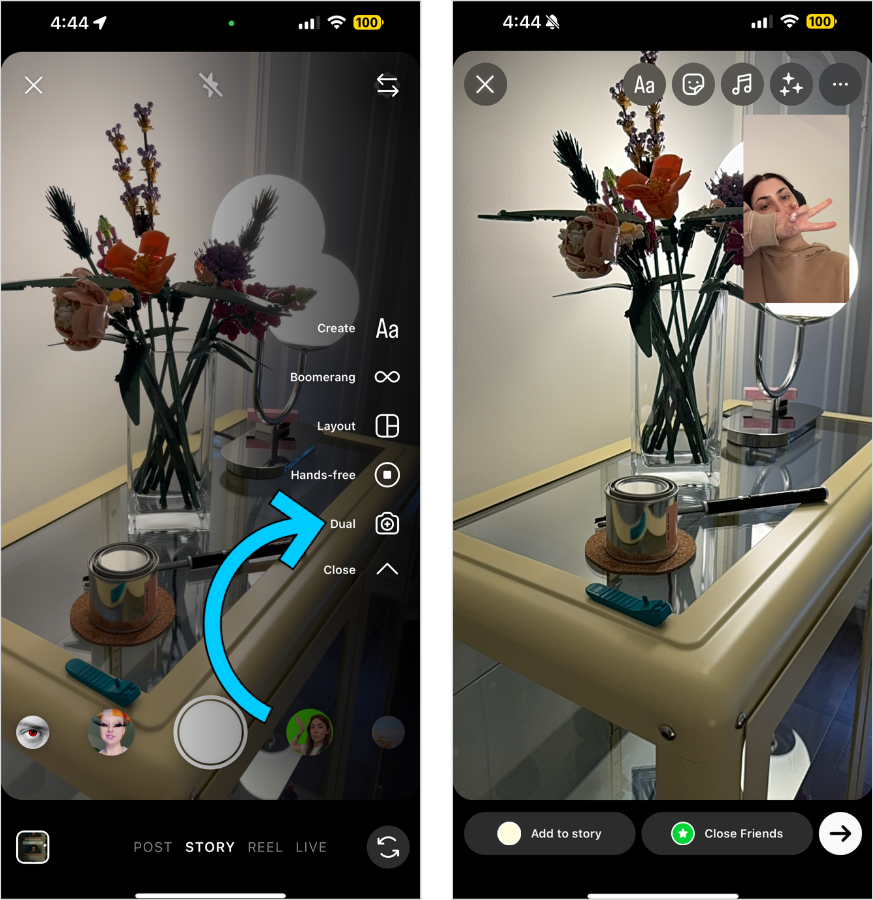
All you have to do is select the Dual feature from the Instagram camera to get started!
Hack #20: Add a GIF Background to Your Instagram Stories
Instagram’s collaboration with GIPHY in Create Mode is truly a hidden gem.
You can choose from thousands of fun GIFs and they’ll either layer up or display in full length, depending on their aspect ratio.
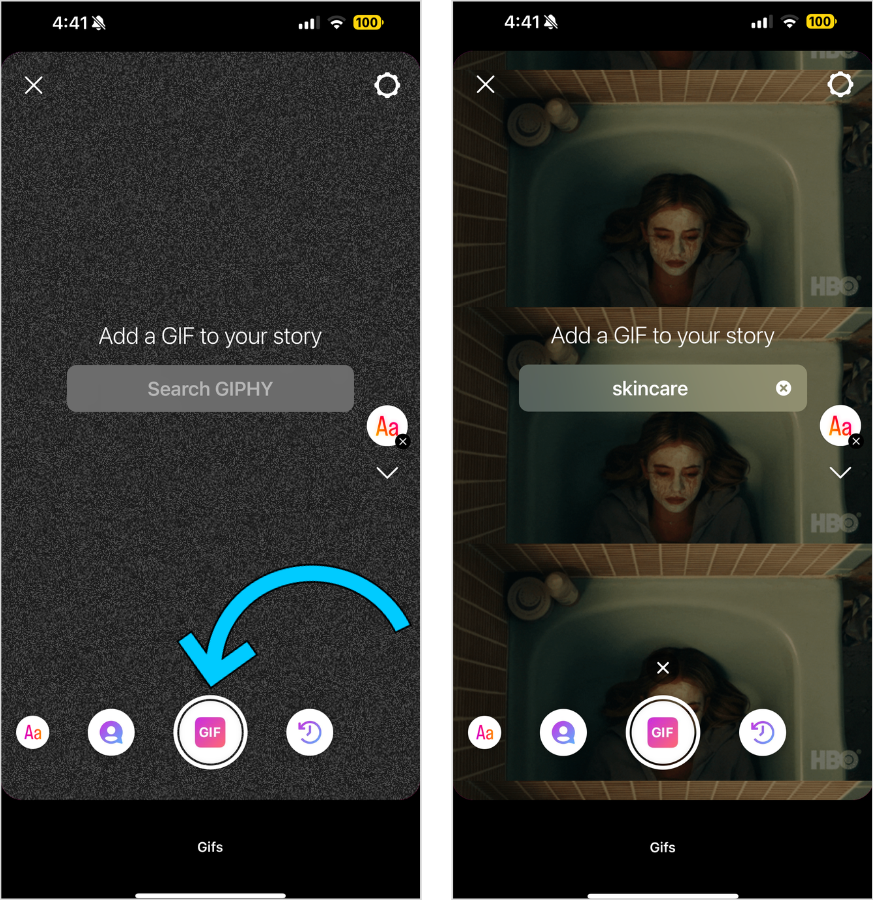
Use them to stay active on Stories if you’re running low on original content!
Hack #21: Schedule Your Instagram Stories in Advance
The Instagram Stories hack of all hacks? Scheduling your stories with Later.
Why? You can visualize how your posts will flow together, win back time, and dig into analytics for the ultimate strategy. A true no-brainer.
And that’s that! With these 21 Instagram Stories hacks at hand, you’re bound to boost your engagement and keep your followers tap-tap-tapping for more.
